• Best Practices – Health & Safety
  • Radio Stream
MediazoneMediazone
  • Our Story
    • Book a Tour
    • Departments
      • University of Nicosia
      • Department of Communications
      • Department of Design and Multimedia
      • UNIC Career Success Centre
        • Employment Opportunities
      • UNIC Portal
  • Reserve Today
    • Student Reservations
    • Troubleshooting for log in
    • Rules & Regulations
    • Schedules
  • Join Mediazone
  • Equipment
    • Video Equipment
    • Photo Equipment
    • Audio Equipment
  • Facilities
    • Tv Production studio
    • Photography Studio
    • Digital Lab
    • Radio Studio
    • Audio Production Studio
    • Audio board instruction
  • Resources
    • Audiovisual Resources
    • SA Training
  • Services for UNIC
    • Brand Center
    • Service Enquiry
    • Useful documents
      • Student Work Release
      • Media Release Form
      • Media Release Form – Under 14
      • Crowd notice/release
      • University of Nicosia Logo for Student Work
    • Video Production Brief
    • Work
  • Blog
  • FAQ
  • Contact Us

The world of interlaced video

Posted On November 23, 2012 By admin In Tip of the week, Tutorials /  

The first step in understanding video in general is to grasp the concepts of interlaced video and progressive video.

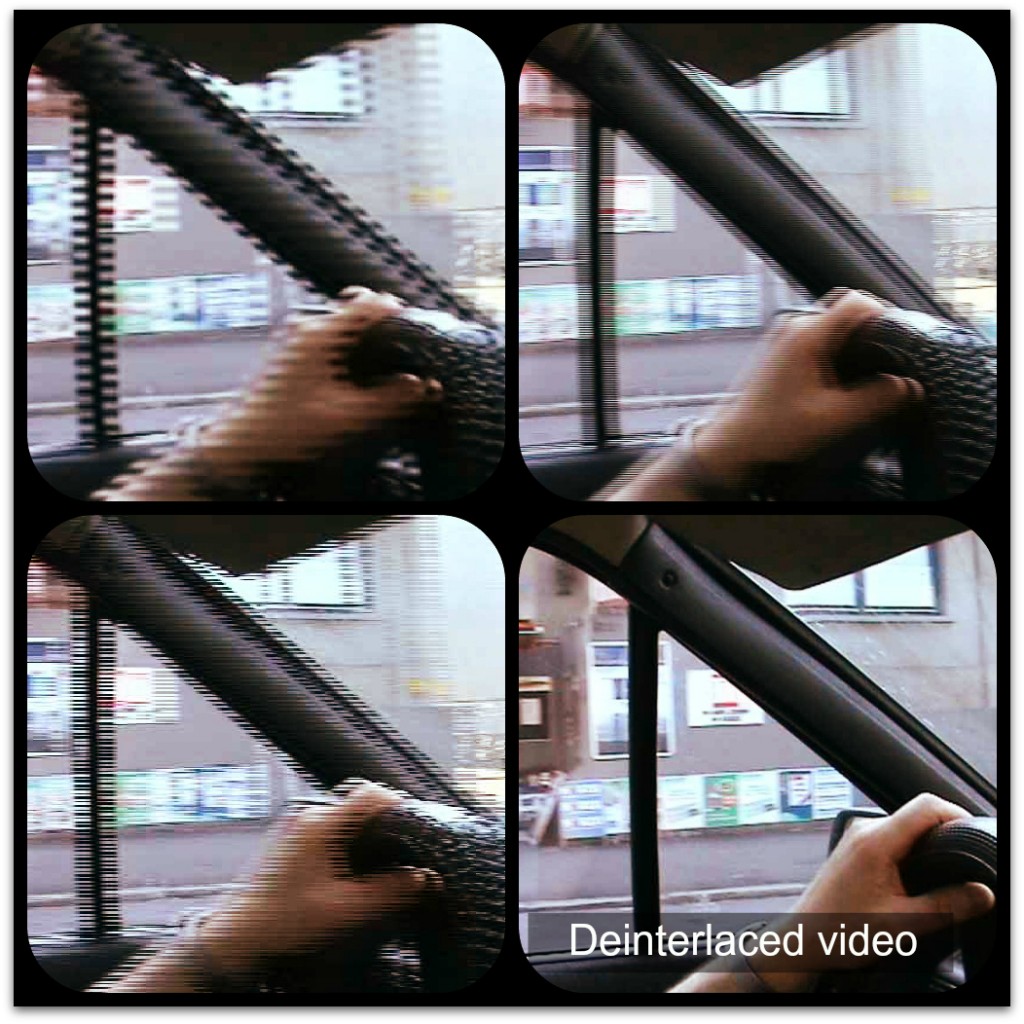
As far as we know the video we shot looked great. Something happens after you look at your export. Unfortunately tvs and computer monitors do not place nice. When recording in pal dv the refresh rate is determined by the camera or the input (A PAL signal sends 50 fields per second). The computer monitor is always at a variable rate between 60 & 85 Hz. So the 50 fps of your video – does not match well with the monitors refresh rate. This is one good case for de interlacing your video.

You will definitely know when this process is required because your video will look something like this and you want it to look like the one at the end.

Every non linear editing system has its own way of dealing with de interlacing video. In Avid Media Composer the most recommended method is as follows:

The effect mode button is on the top portion of the timeline – which can access the motion effect editor. The Timewarp motion effect (adjusted with the Motion Effect Editor) can be used to de interlace with the following settings:

  • Type: Both Fields
  • Source: Interlaced
  • Check Adaptive Deinterlace Source
  • Output: Progressive 

J.I – Acting Head – Mediazone

Tags:
AdaptiveAVIDde interlacededitinginterlacednon linearPALprogressiverateRecordingsignalTimewarp
Mobile phones & me!
Sport Cams

Recent Posts

  • SHOOTING A FILM IN NICOSIA: HOW TO TRANSFORM EVERYDAY PLACES INTO CINEMATIC SETTINGS
  • MAKING NICOSIA LOOK LIKE A SCIFI CITY WITH EDITING
  • How to get a Cinematic Look with just a Tripod
  • The Gimbal challenge: What’s the Longest Take We Can Pull Off?
  • Behind the Screens: The Unseen Challenges of Running a University AV Department

Archives

Categories

  • Announcements (64)
  • Engineering (9)
    • Software (5)
  • Equipment Tutorials (2)
  • Gadgets & more Gadgets! (8)
  • HandBooks (2)
  • News (190)
    • Alumni Corner (4)
  • Software Tutorials (5)
  • Student Upload Section (21)
    • AUDIO (4)
      • COMM 116 Audio Production (4)
    • RADIO (1)
      • COMM 216 Radio Production (1)
    • VIDEO (16)
      • COMM 117 Video Production (4)
      • COMM 210 Production Techniques (3)
      • COMM 235 Creative Production (4)
      • COMM 311A Electronic Journalism Television (4)
  • Studio Assistants Blog (111)
  • Tip of the week (13)
  • Tutorials (14)
  • Uncategorized (11)
Copyright 2018 © Mediazone, University of Nicosia.
  • Contact Us
  • Privacy Policy
  • Terms of service